Showing posts with label rhinestones. Show all posts

February 5, 2015

Watercolour Nails + Born Pretty Store Crystals | Review & Nail Art


Hey there! I have been wanting to do watercolour nails for sooooo long. So here I am, with a watercolour nail art design decorated with pretty holo silver rhinestones I received from Born Pretty Store. To me, this manicure is kind of Barbie-ish, but I have to admit: I kind of like it though. Next time I will probably use some lighter colours, to make it more classy. But for now, this will do!


For those who do not know how to do watercolour nails, I used this tutorial by ChrissyAi. It is pretty straightforward and once you get the hang of it, it is a breeze and fun to do!


The rhinestones on my index and ring finger are from Born Pretty Store. In the wheel you get 4 different sizes and approximately 200 pieces for $4.47. For me, the largest size (5 mm) is a little bit too big as my nails, and especially my ring finger, are very curved. The other sizes fit perfectly!

Same as other rhinestones or studs, you can easily apply them on your nails using nail polish or nail glue.


Products used for this manicure:
Please note that I am not quite sure about what colours I used.. WOOPS, I am soooorry! :-D


Have you tried watercolour nails? I would love to see them! And do you like doing them? I feel like it is lazy nail art, and I looove lazy nail art hahaha. :-D

If you want to buy these gorgeous rhinestones yourself, make sure to use my coupon code THL91 to get 10% off of your order! <3


*Rhinestones were sent to me for my honest review*

January 2, 2015

Elegant Silver Glitter NYE Nails


Hi loves! First of all: HAPPY NEW YEAR EVERYONE!! Today I will be showing you my elegant NYE manicure I planned to wear. Planned, yes. Because I did not actually wear it on NYE. I painted this design the day before, but I had some friends coming over for manicures. And why yes of course, I ruined them. But enough rambling, let's move onto some pretty pictures!


In case you were having a déjà vu: I recycled my See-Through Lace and Rhinestones design. I loved my ring finger and thumb so much and I obviously did not want to take it off just yet!


Polishes and materials used for this design:
OPI - Don't Bossa Nova me around
Sinful Colors - Snow me white
Sally Hansen - Insta-Dri
Born Pretty Store - Striping brush
Born Pretty Store - Nail art brush
Born Pretty Store - Dotting tool
Born Pretty Store - Small beads
Born Pretty Store - Round 2 mm rhinestones
Born Pretty Store - Round 4 mm rhinestones
Loose glitter


 I hope you had a wonderful NYE, I sure did! What did you wear on your nails?


December 28, 2014

See-through Lace and Rhinestones Nails


Hey guys! No more prompts today; the 12 Days of Christmas Challenge is over :'(. In case you missed one of them, you can always check them out here on my blog! For today, I have this Japanese see-through lace and rhinestones design. It is elegant, classy and edgy: perfect for New Year's Eve!


How to do the lace design:

1. Apply your favourite base coat.
2. Carefully outline your nails using a dark polish, I used black. Let dry.
3. Mix your dark polish with some clear polish.
4. Paint your nails with the see-through mix you just created.
5. Draw on 7 small dots using a dotting tool or a toothpick. Let dry.
6. Apply your fast drying topcoat.

Et voilà, you got yourself some classy see-through nails!


How to do the rhinestones design:

1. Drip some fast drying top coat on a piece of plastic. Make sure it dries to a tacky consistency.
2. Pick up some tacky top coat and place it on the nail.
3. Create a little ball. More like half of a ball. :-D Let dry.
4. Pick up your rhinestone, dab it in some fresh top coat and apply on the side of the ball.
5. Continue step 4 until desired effect.
6. Optional: apply a fast drying top coat. This is optional because it can drown your rhinestones, but it will make your manicure last longer. It is up to you!

There you go, a Japanese rhinestone design!


Polishes and materials used for this design:

Catrice - Black to the Routes
OPI - Don't Bossa Nova me around
NYC - Grand Central Station (used for mixing)
Sally Hansen - Insta-Dri
Born Pretty Store - Striping brush
Born Pretty Store - Nail art brush
Born Pretty Store - Dotting tool
Born Pretty Store - Small beads
Born Pretty Store - Round 2 mm rhinestones
Born Pretty Store - Round 4 mm rhinestones


 I hope you like this design and if you did, make sure to write a comment! ;-)

What would you like to see on my blog? Some last minute New Year's Eve design? Something geometric? Swatches? Let me know, I would love to hear from you. :-) <3


December 15, 2014

12 Days of Christmas Challenge: Christmas Decorations


Hi guys! Just in time I present you: my Christmas Decoration nail art. Later on I will tell you more about my inspiration and the polishes I used, so make sure to keep reading!


For this nail art design I was inspired by Shellnail1120 on Instagram, in particular this Christmassy design. I love love love everything about her manicure. And I wish I had the same glitters and rhinestones, so my design would turn out a bit better.

Materials and polishes used for this design:
Sinful Colors - Snow me white
Catrice - Goldfinger
Fine gold glitter
Small beads (Born Pretty Store)
Round 2 mm rhinestones (Born Pretty Store)
Elliptic rhinestones (Born Pretty Store)
Hex glitters (Born Pretty Store)
Some cheap small rhinestones


As always, make sure to check out the ladies below!


February 9, 2014

Very late New Year's nails!


Yup, you read that one right. NEW YEAR'S NAILS. As I said in my previous post, I literally had NO time to post anything past month.. So I am posting them now, because I think they are to stunning!


Here is a close-up of my middle finger. For these nails I was inspired by Vanity Projects. I looove the triangle of rhinestones and studs, hmmm.


This is a close-up of my ring finger. I used NYC City Blackout, the rhinestones and studs are all from Born Pretty Store.


Still in love with these nails, really!

Btw, don't forget to enter my giveaway if you want to win some pretty Let it Glitter! polishes!

Hope you like these nails, guys!


May 12, 2013

Forever Polished - Pastel Me Right


I'm back with another Forever Polished lacquer! YAY, CONFETTI, YAY! This time I will be showing you Pastel Me Right. I won't let you wait any longer, so without further ado: LET'S MOVE ON! (to the swatches ofcours)


Here is what Ashley had to say about Pastel Me Right: "Pastel Me Right is a lilac shimmer base
with added pastel shapes. From hearts, stars, shreds, and fine glitter."


It is kind of a frosty pastel shade with a beautiful shimmer in in!


I painted on 3 coats of Pastel Me Right to get a full coverage. I smoothed it out with my Essence - Top Sealer. It applied super easy and drying time is OK as usual. I did fish a bit for the stars, and I was not able to catch a little heart, mememe.


I usually do not like frosty polishes, but this one is the exception I think!

You can find Forever Polished on Facebook and you can buy Ashley's beauties on Bigcartel!


Forever Polishes lacquer was sent to me for my honest review.

February 3, 2013

Forever Polished - Sea Monster


I'm back with a Forever Polished swatch! This time it is Sea Monster, it is one of my favourites so make sure to check out all the pictures!


Sea Monster is packed with small blue and green glitters and silver hex holographic glitters. It goes on very smootly and the shine is incredible. I am a sucker for blue-ish green-ish teal-ish glitter polishes, so it is no wonder that this polish is one of my favourite glitter lacquers!


I layered two coats of Sea Monster over white and sealed it in with Essence Top Sealer. The accent nail is Only You - White French and rhinestones from Born Pretty Store. You can find the white - light blue rhinestone here, the blue rhinestone here and the small silver ones here. Don't forget to use my coupon code AYJ61 to get 10% off!


You can find Forever Polished here and Facebook, polishes are $8 for 15ml. Make sure to use this special discount code LoveLifeLacquer to get 20% off!


Product was sent to me for my honest review.

December 2, 2012

12 Days of Christmas: Christmas Tree


So this happened, I joined a Christmas Challenge. I never did a nail art challenge before, so it was about time! And I really wanted to do a Christmas Challenge so.. Perfect!

Today's the first day of the challenge and the theme is, as you obviously can see, Christmas Tree. And here's my creation!


This is what I used for this manicure:
  Only You - Geisha
  Acrylic Paints
  H&M - Cherry
  Catrice - Golddigger
  Round rhinestones from Born Pretty Store
  Nail art brushes from Born Pretty Store
  Essence - Top Sealer

Wednesday is the next Challenge, EXCITEMENT!

Oh by the way, if you want to buy some nail art brushes or rhinestones yourself, don't forget to use my Born Pretty Store coupon code AYJ61 and get 10% discount on your order!

Are you participating in a Christmas Nail Art Challenge?


August 26, 2012

Accent Nail: Part II


Déjà vu? OUI!
As I loved my accent nail so much, I decided to keep it a bit longer. And I thought a pink gradient would fit perfectly!

For the gradient I used Gosh - Neon Baby and Gosh - Bubble Gum.
If you want to know what products I used for the accent nail, take a look over here!

August 22, 2012

Accent Nail


Here's a simple manicure with a solid colour and a *BOOM* accent nail!
The solid colour is Exotic Encounters from the China Glaze On Safari collection. My friend Emily gave this to me - yay happy dance, love you love you love you Emily! -, it is such a beautiful colour!

Here is (kind of) a close up of the accent nail:


For the *BOOM* accent nail I used steel ball, gold square studs, round black studs, round silver studs, round gold studs, 2 mm rhinestones, 3 mm rhinestones and elliptic rhinestones. I guess that's all... HA!


April 24, 2012

Birthday nails


YAY IT'S MY BIRTHDAY! I'm not a teenager anymore!

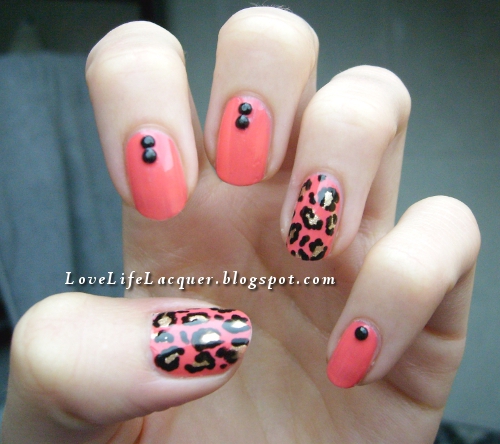
This is actually an ordinary manicure, especially for a birthday. But I'm in looooove with the coral, really.

So here's what I used:
Catrice - Meet me at Coral Island
Catrice - Golddigger
NYC - City Blackout
Essence - Sealing Topcoat
I created the leopard print using dotting tools from Born Pretty Store. The black rhinestones, which are absolutely adorable, are also from Born Pretty Store and you can find them here.

What kind of manicure did you do for your birthday? (PICTURES!)

March 10, 2012

Born Pretty order

A fortnight ago a placed my first order at Born Pretty Store. They got a lot of stuff and supercheap! And also, it's free shipping, worldwide!
So, I was super impatient for it to arrive, and then finally! Last Tuesday my mom texted my that my package had arrived! I was sooo happy and couldn't wait to get home from school.

Here's what I ordered:
  • Nail art brushes, 3 pc (here, $3.15)
  • Small nail art brushes, 4 pc (here, $3.51)
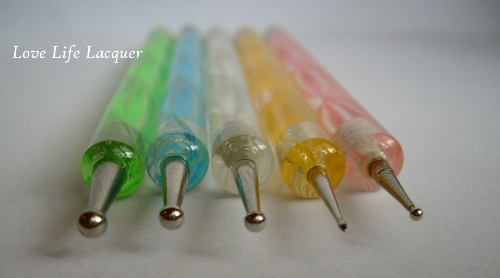
  • Dotting tools, 5 pc (here, $4.09)
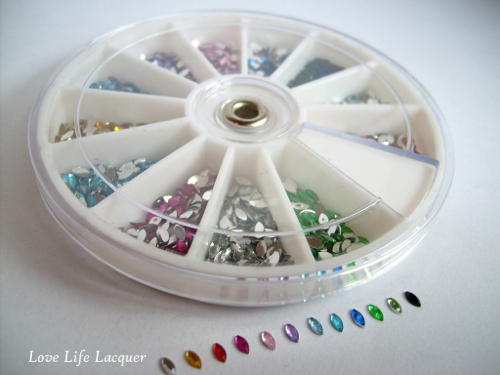
  • Elliptic shape rhinestones (here, $2.92)
  • Round shape rhinestones (here, $3.33)
  • Nail lacquer thinner (here, $7.45)
  • Silver hexagon glitter (here, $2.38)
  • Foam nail art stand (here, $3.38)
  • Acrylic nail tips, 500 pc (here, $6.02)
  • 7-way nail file and buffer (here, $1.53)

For all this I had to pay, prrrrprrrrprrrrrr, € 29,04!


Nail art brushes
These three brushes are great for cleaning your nails and cuticles after you polished them. Ofcours, you can also use them for doing nail art on your nails.

Small nail art brushes
I absolutely LOVE these nail art brushes. First, I only had one, not really good, brush and now I have four! They're pretty amazing and they do an incredible job. Emily said these brushes are a must-buy, she's right!


Dotting tools


Ah, finally I got my own real dotting tools. Each tool has a different size of dot on one side, and on the other side they all got the same dot. Apart from dotting, you can also use them for picking up rhinestones, or drawing lines, so they come in handy very often.

Elliptic rhinestones
EEEEEEEEH rhinestones! :-)

Round rhinestones
EEEEEEEEH rhinestones! :-)²

Silver glitter

I'm so happy with this glitter. I thought it just was a silver glitter, but when I unwrapped it, I saw it has a bit of a holographic effect, which i like. You can use a dotting tool to pick up the glitters one by one and put them on your nails. But you can also just dip your finger in the jar. Hellloooooo disco nails! 

Foam nail art stand

First, I saw this nail art stand on Emily's blog. When I was at her place, I immediatly knew I needed this! You can stick an acrylic nail tip on top of it, so you can easely paint and decorate your tips!


My nails feel like soft like a baby's bottom, so thumbs up for this one!


In case you're wondering why there is no picture of the thinner, well it's just a bottle. Not really interesting to look at. BUT it does an amazing, incredible, fantastic job. It already saved some of my polishes, yay!


Have you ever ordered something at Born Pretty Store? 


Related Posts Plugin for WordPress, Blogger...